2D vs. 3D AI Interior Design: What’s the Difference?
AI interior design tools can produce very different results. Some generate a new image of your room; others help create a 3D space where you can inspect the layout and edit individual objects.
Both approaches are useful, but they support different design decisions.
Image-based AI helps you explore how a room could look. Editable 3D AI helps you plan and adjust how the space is arranged.
For example, an AI-generated living room image might show a sofa you like. But if you want to move it, check the space behind it, or view the layout from the other side of the room, the image alone is not enough.
Here is how the two approaches compare, and where SenHOME fits.
1. What Is 2D AI Interior Design?
In this article, “2D AI interior design” means generating or editing interior images, rather than conventional 2D floor plans.
The process usually starts with a room photo, a reference image, or a written description. The tool then generates a new image with different furniture, colors, materials, or styling.
This works well for questions such as:
- Would a warmer color palette suit this room?
- Do I prefer a minimalist interior or one with more decorative detail?
- How would light wood look with a dark sofa?
You can compare visual directions before making more detailed design decisions.
The limitation is that a generated image does not necessarily contain an editable room model. Furniture may look realistic without existing as separate objects with defined dimensions and positions.
Some tools support local image edits or additional viewpoints. Those capabilities alone do not mean the tool provides an editable 3D scene.
2. What Is 3D AI Interior Design?
Editable 3D AI interior design combines AI generation with a spatial model.
The workflow uses room geometry, furniture objects, materials, and positions, rather than producing only an image. Depending on the software, you can select objects, adjust the layout, and view the same scene from different angles.
The generated result can therefore remain part of the ongoing design process.
You can review furniture placement, make changes, and keep adjusting the same space. When the room and furniture data are correctly scaled, the model can also support size and spacing checks.
A 3D model does not automatically guarantee accuracy or mean a proposal is ready for construction. Its usefulness still depends on correct input data and the tool’s editing capabilities.
3. Modern Living Room Design: Comparing the Steps
Both examples below aim for a modern living room, but they use different spaces. One starts with a room photo and produces a furnished image. The other develops a design in SenHOME’s 3D workspace, where the furniture and layout remain editable.
| Stage | Image-based 2D design | Editable 3D design |
|---|---|---|
| Start | Upload a room photo | Import a floor plan and check the room structure |
| Generate | Choose Modern and describe the desired result | Choose an inspiration or provide images and text |
| Refine | Edit the image or generate another version | Use AI or DIY controls to adjust furniture, materials, and specific areas |
| Review | Assess the generated image | View the same scene from different positions |
| Present | Save the image | Save the project and generate rendered images |
Start with the Room You Have
An unfinished room can be hard to imagine furnished. The 2D example starts with a photo: select Modern, describe the seating and storage you want, and generate an initial proposal.
The result brings together a light sofa, wooden furniture, a large rug, and warm lighting. You can decide whether you like the combination without first choosing every individual product.
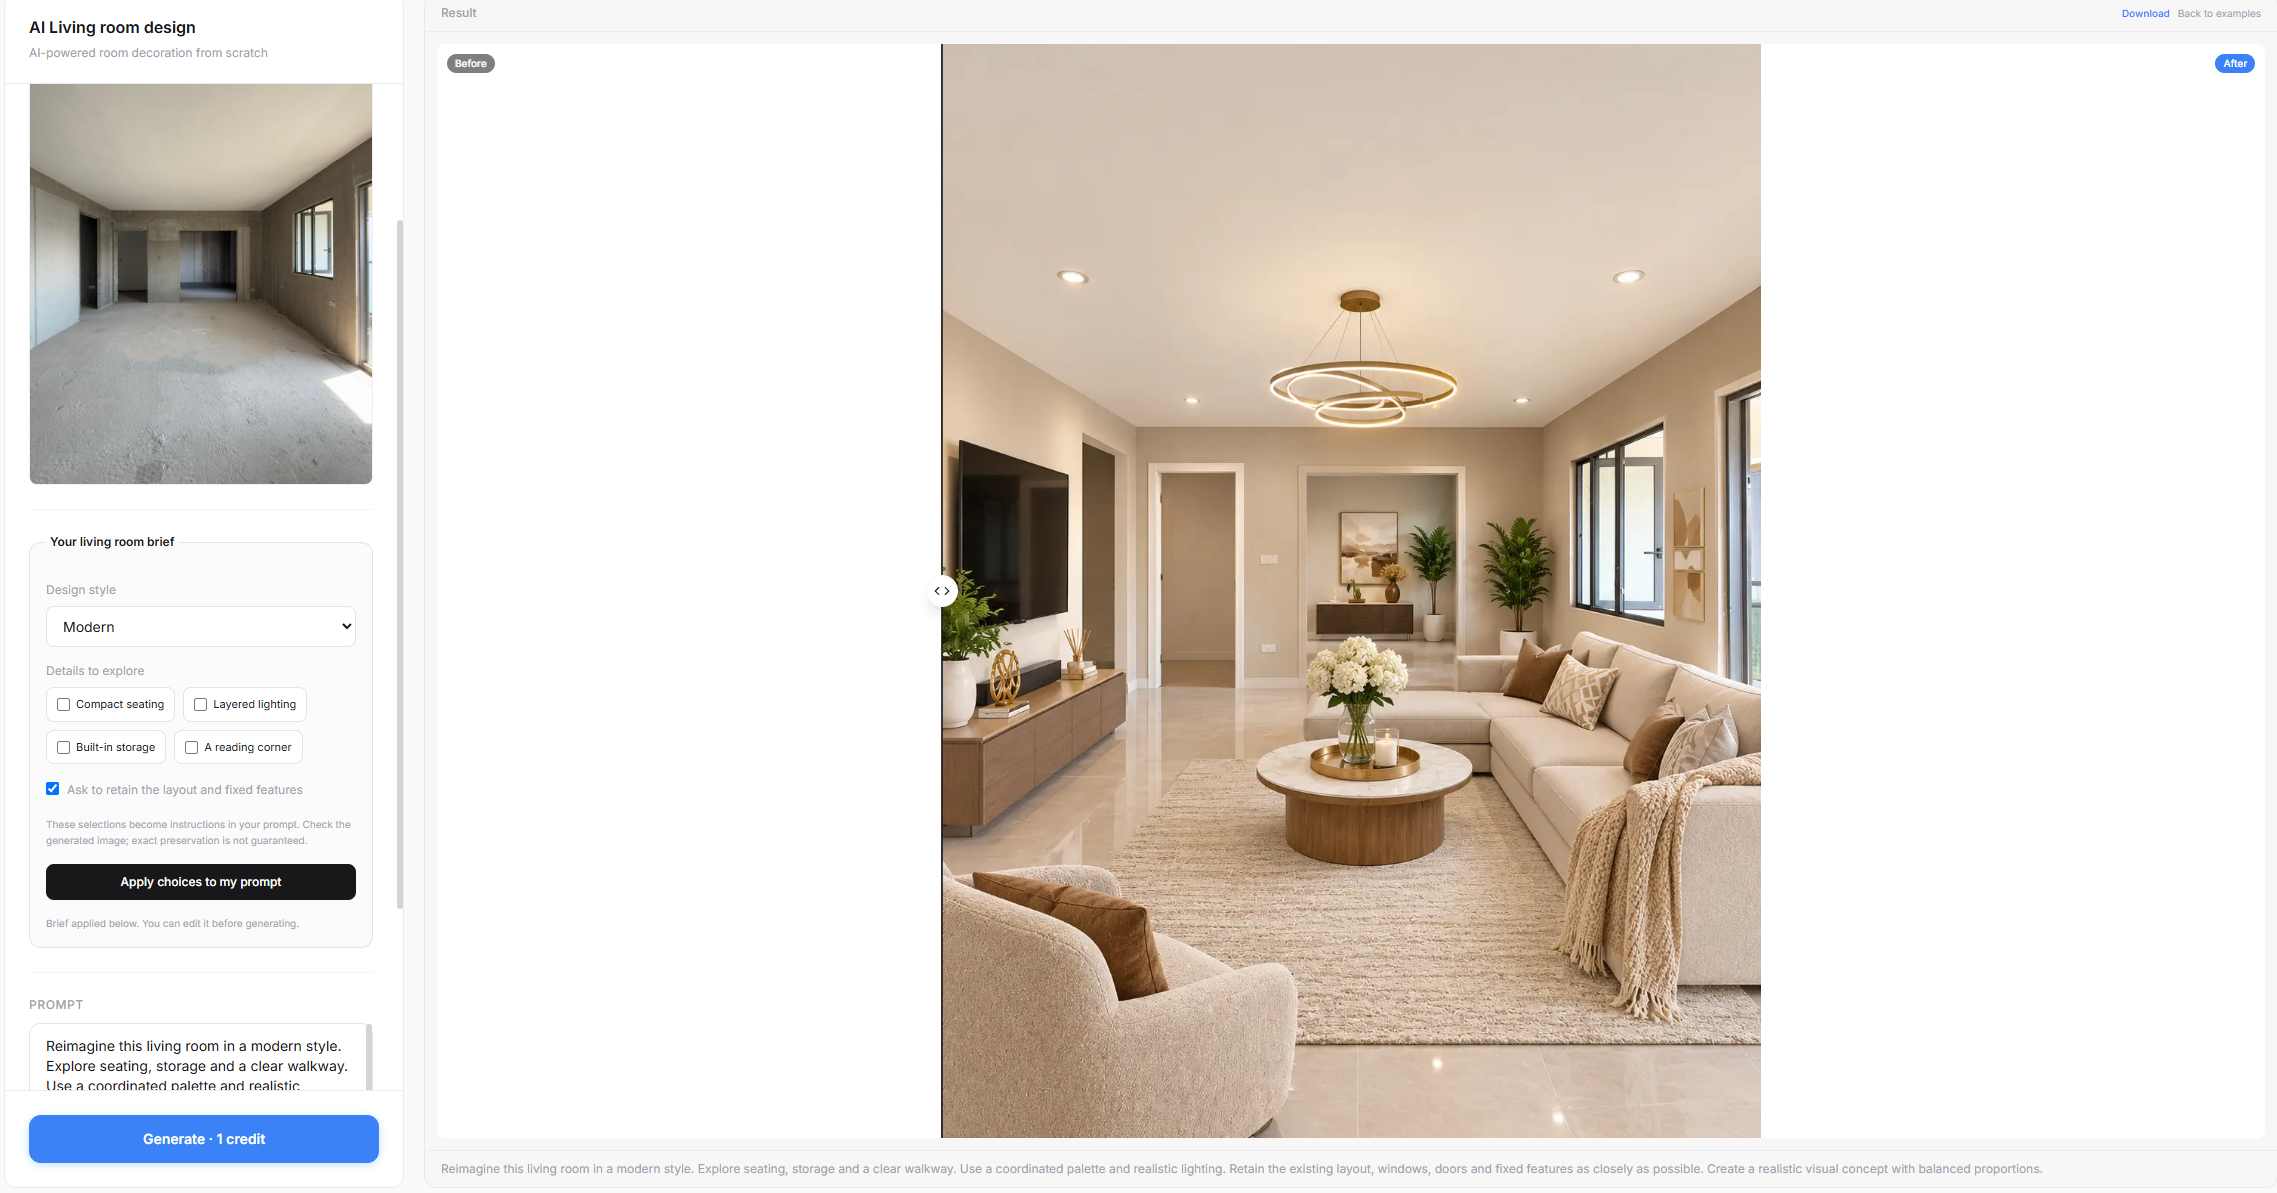
This is useful for answering, “Would this style suit my room?” Exact furniture positions and clearances require more information than the image provides.
The 3D example starts with a floor plan. Before furnishing it, you can check the room boundaries and door and window positions. These details affect where furniture can go and which routes need to stay open.
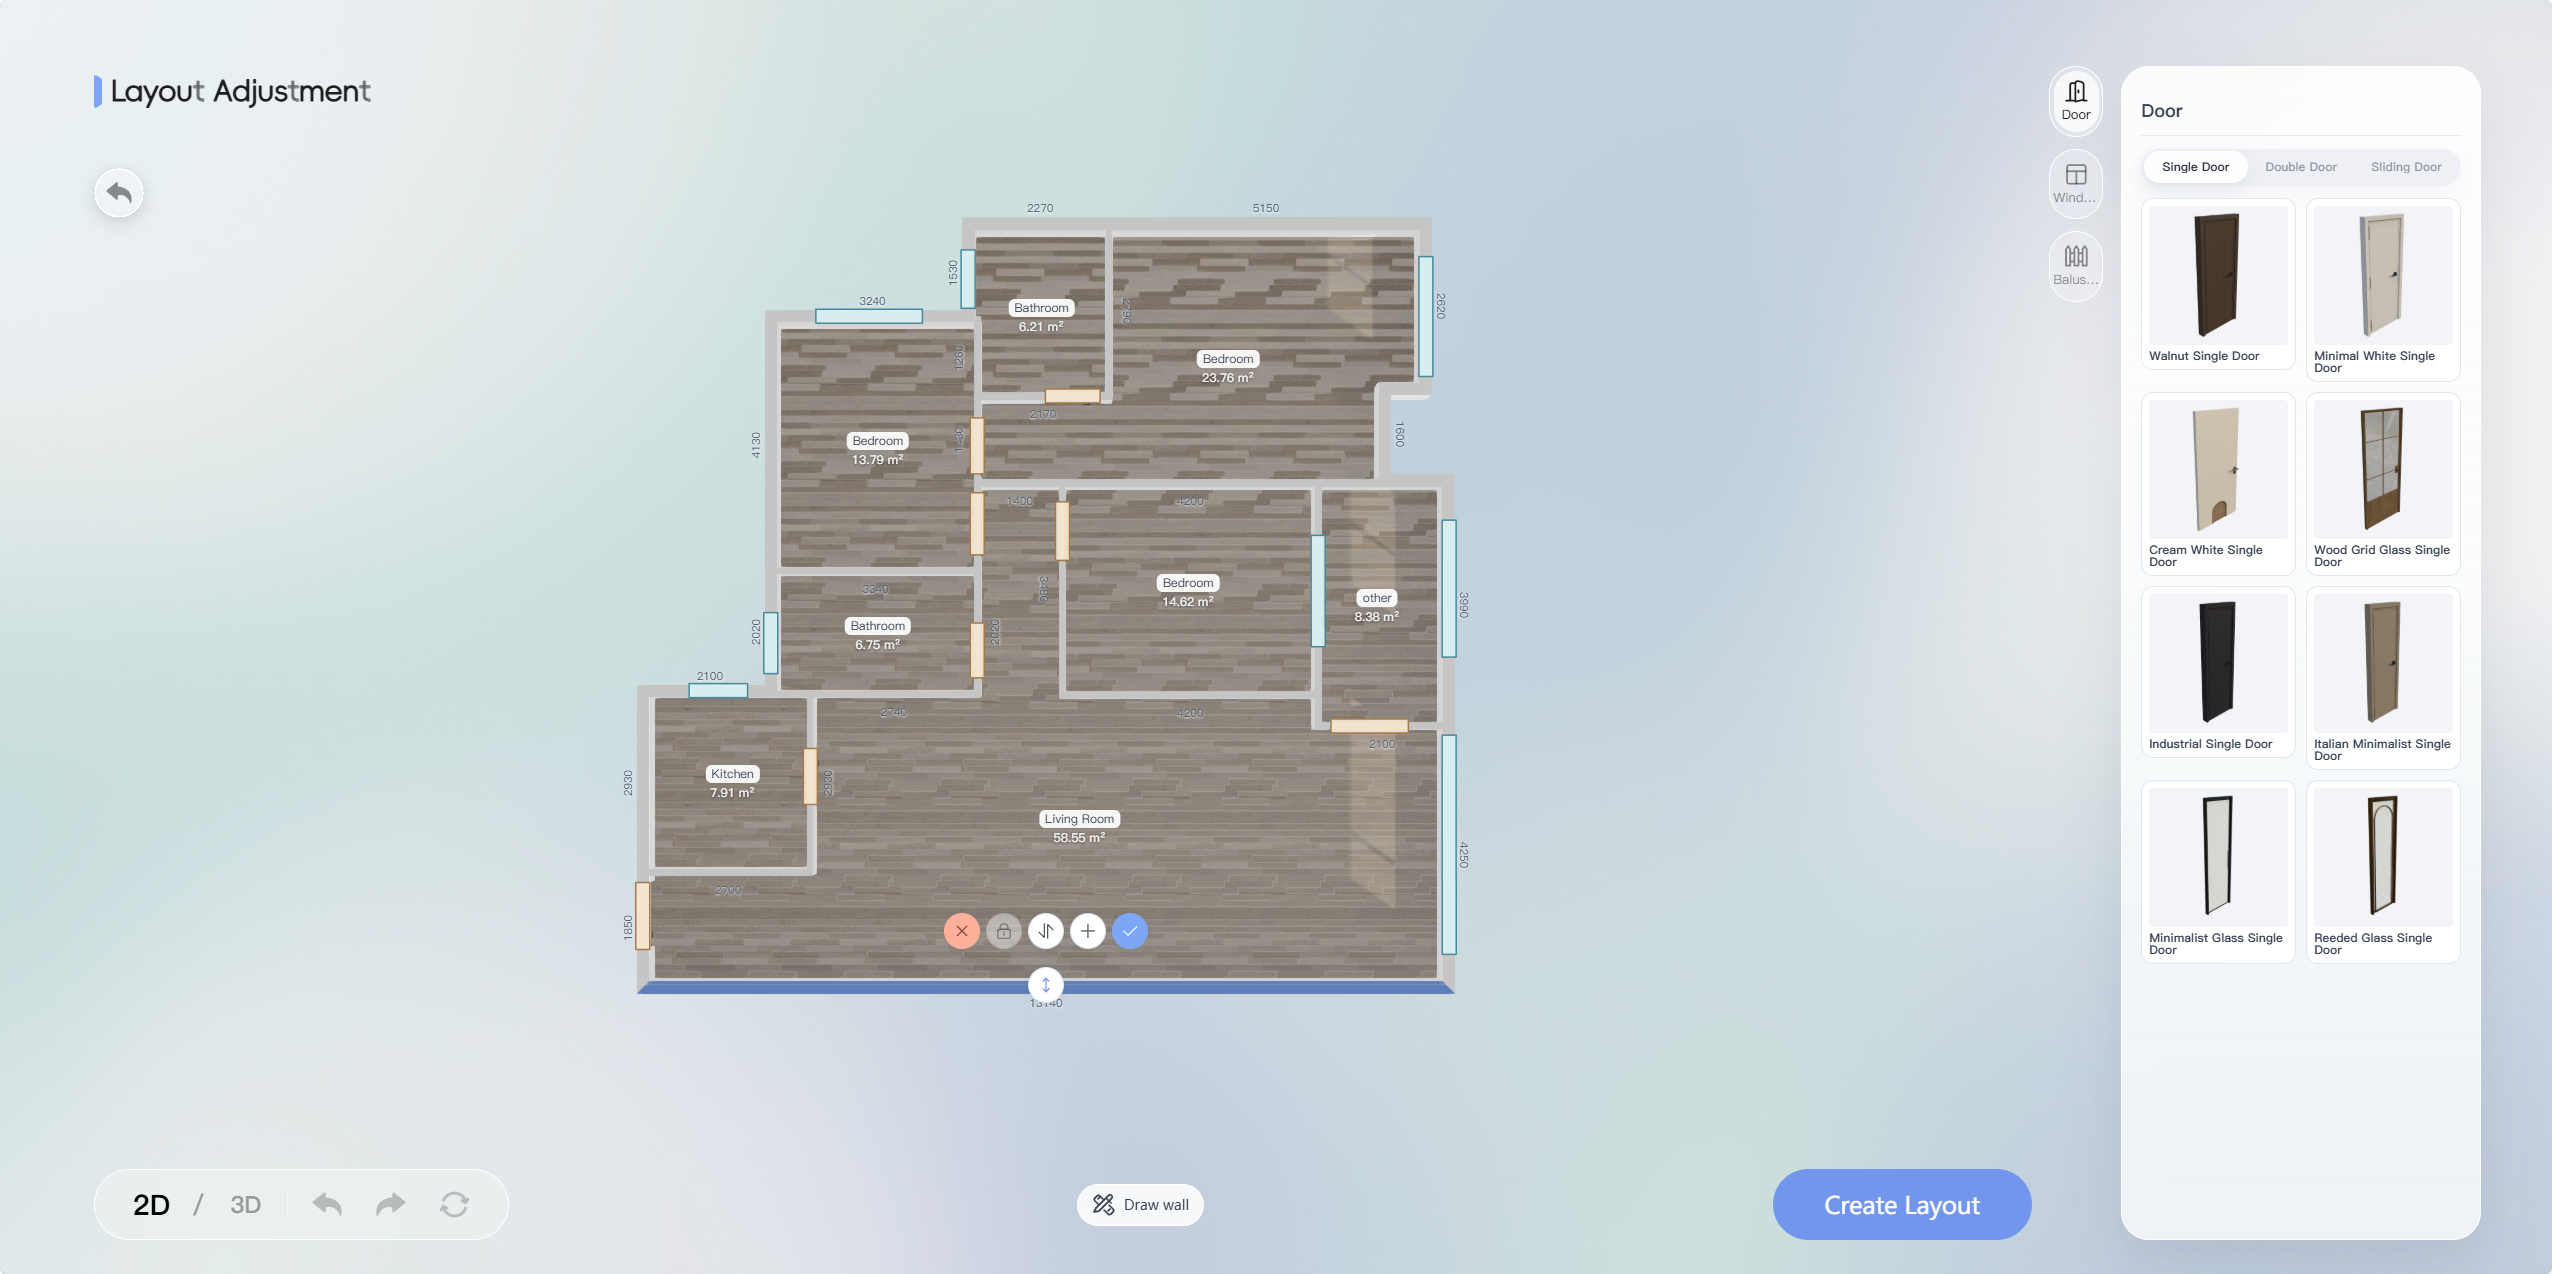
Get a Proposal, Then Work Through the Choices
In SenHOME, you can choose an inspiration or describe your requirements with images and text. If you already have furniture models you want to use, you can include them for priority placement during generation.
The modern living room below is an initial proposal. The sofa, coffee table, and shelving are already arranged, so you can review how they work together without starting by placing every item yourself.
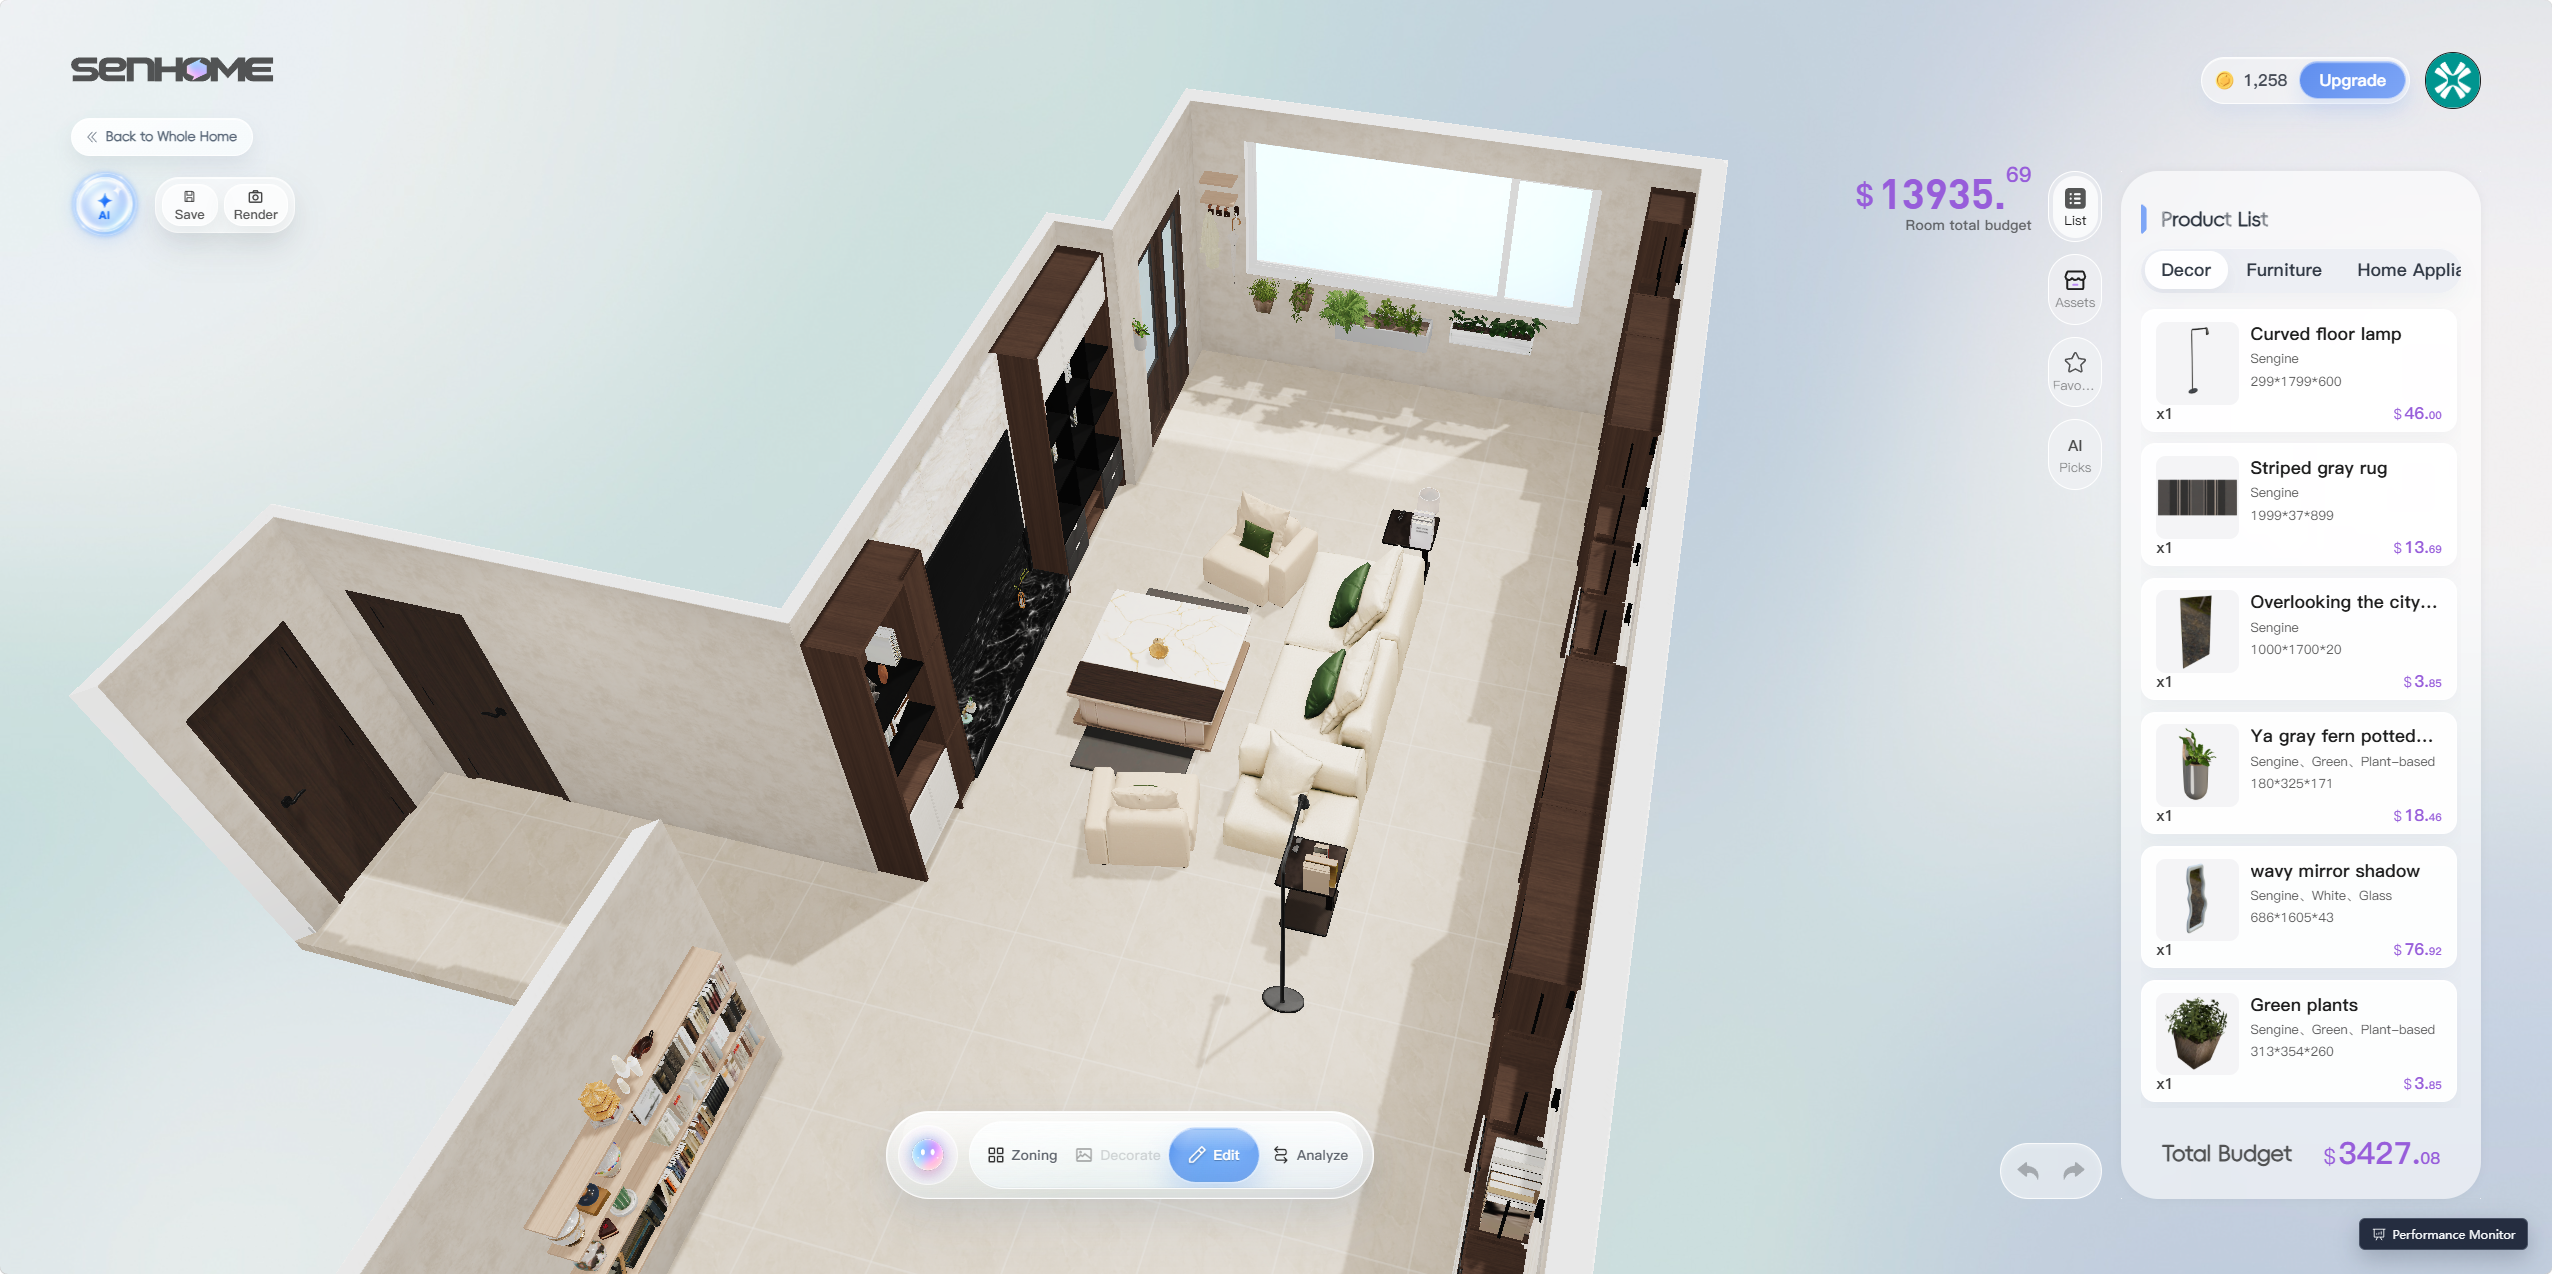
The next decision might be specific: the overall design works, but you want a different sofa.
With a 2D result, you would request an image edit or generate another version. In SenHOME, you can select the sofa and browse alternatives while keeping the current room in view.
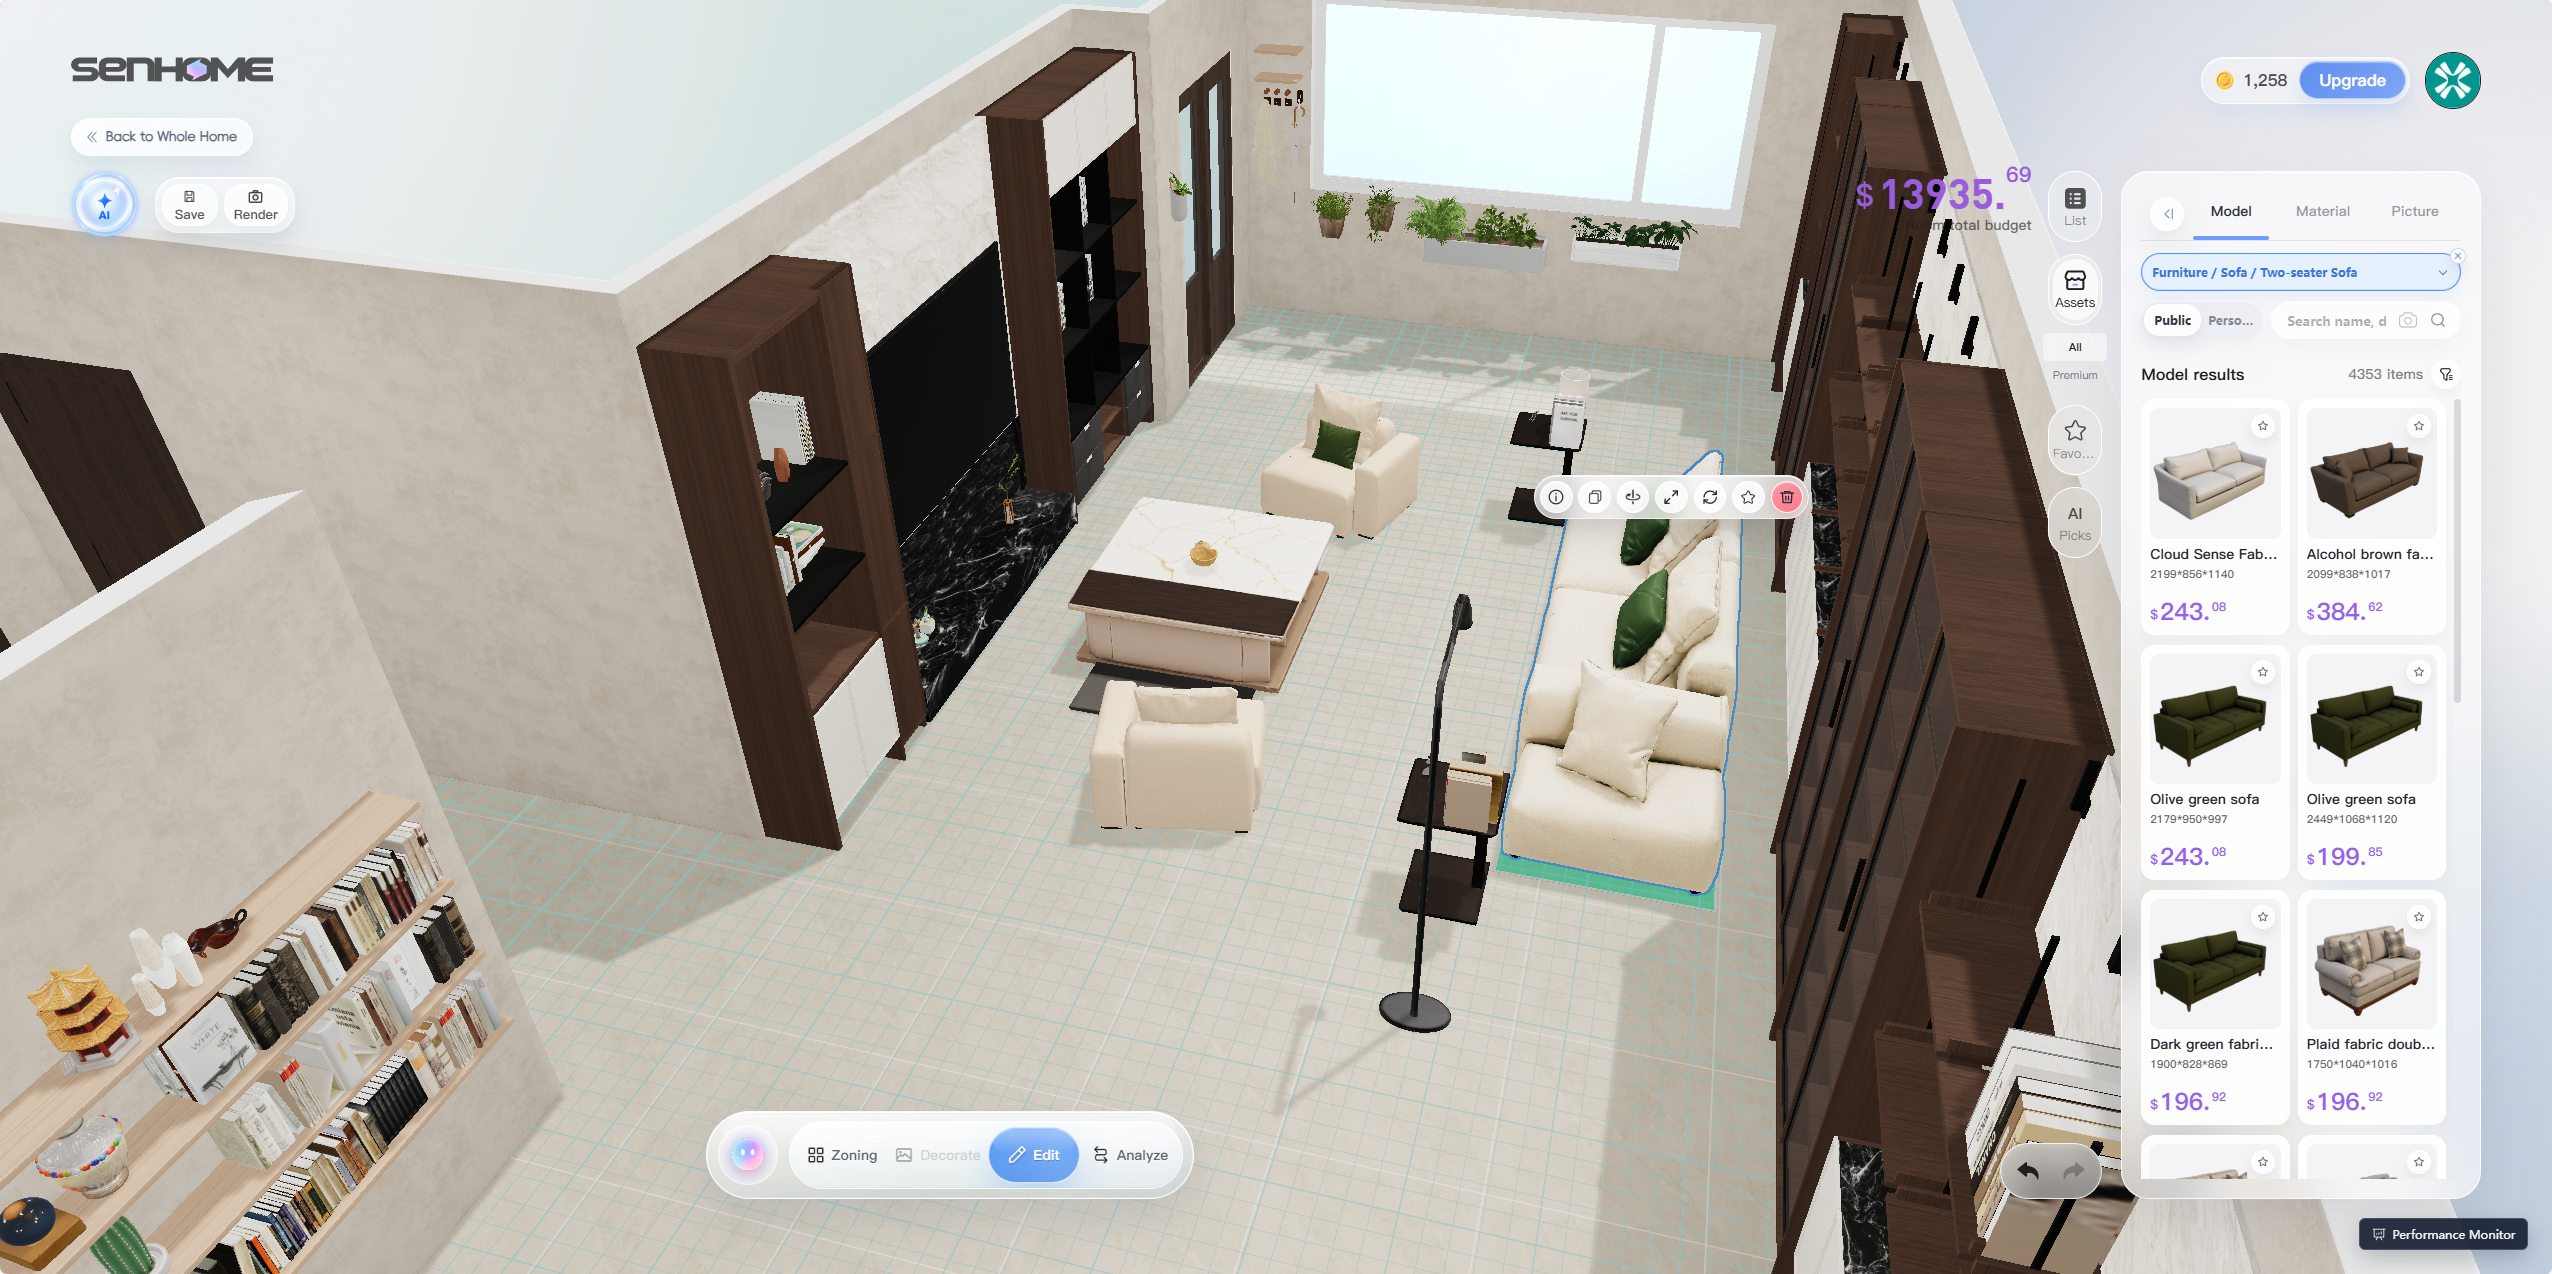
You can then inspect the layout from above. The positions of the sofa, armchairs, and coffee table are easier to see, making it easier to decide whether they need further adjustment. Actual spacing checks still require accurate dimensions.
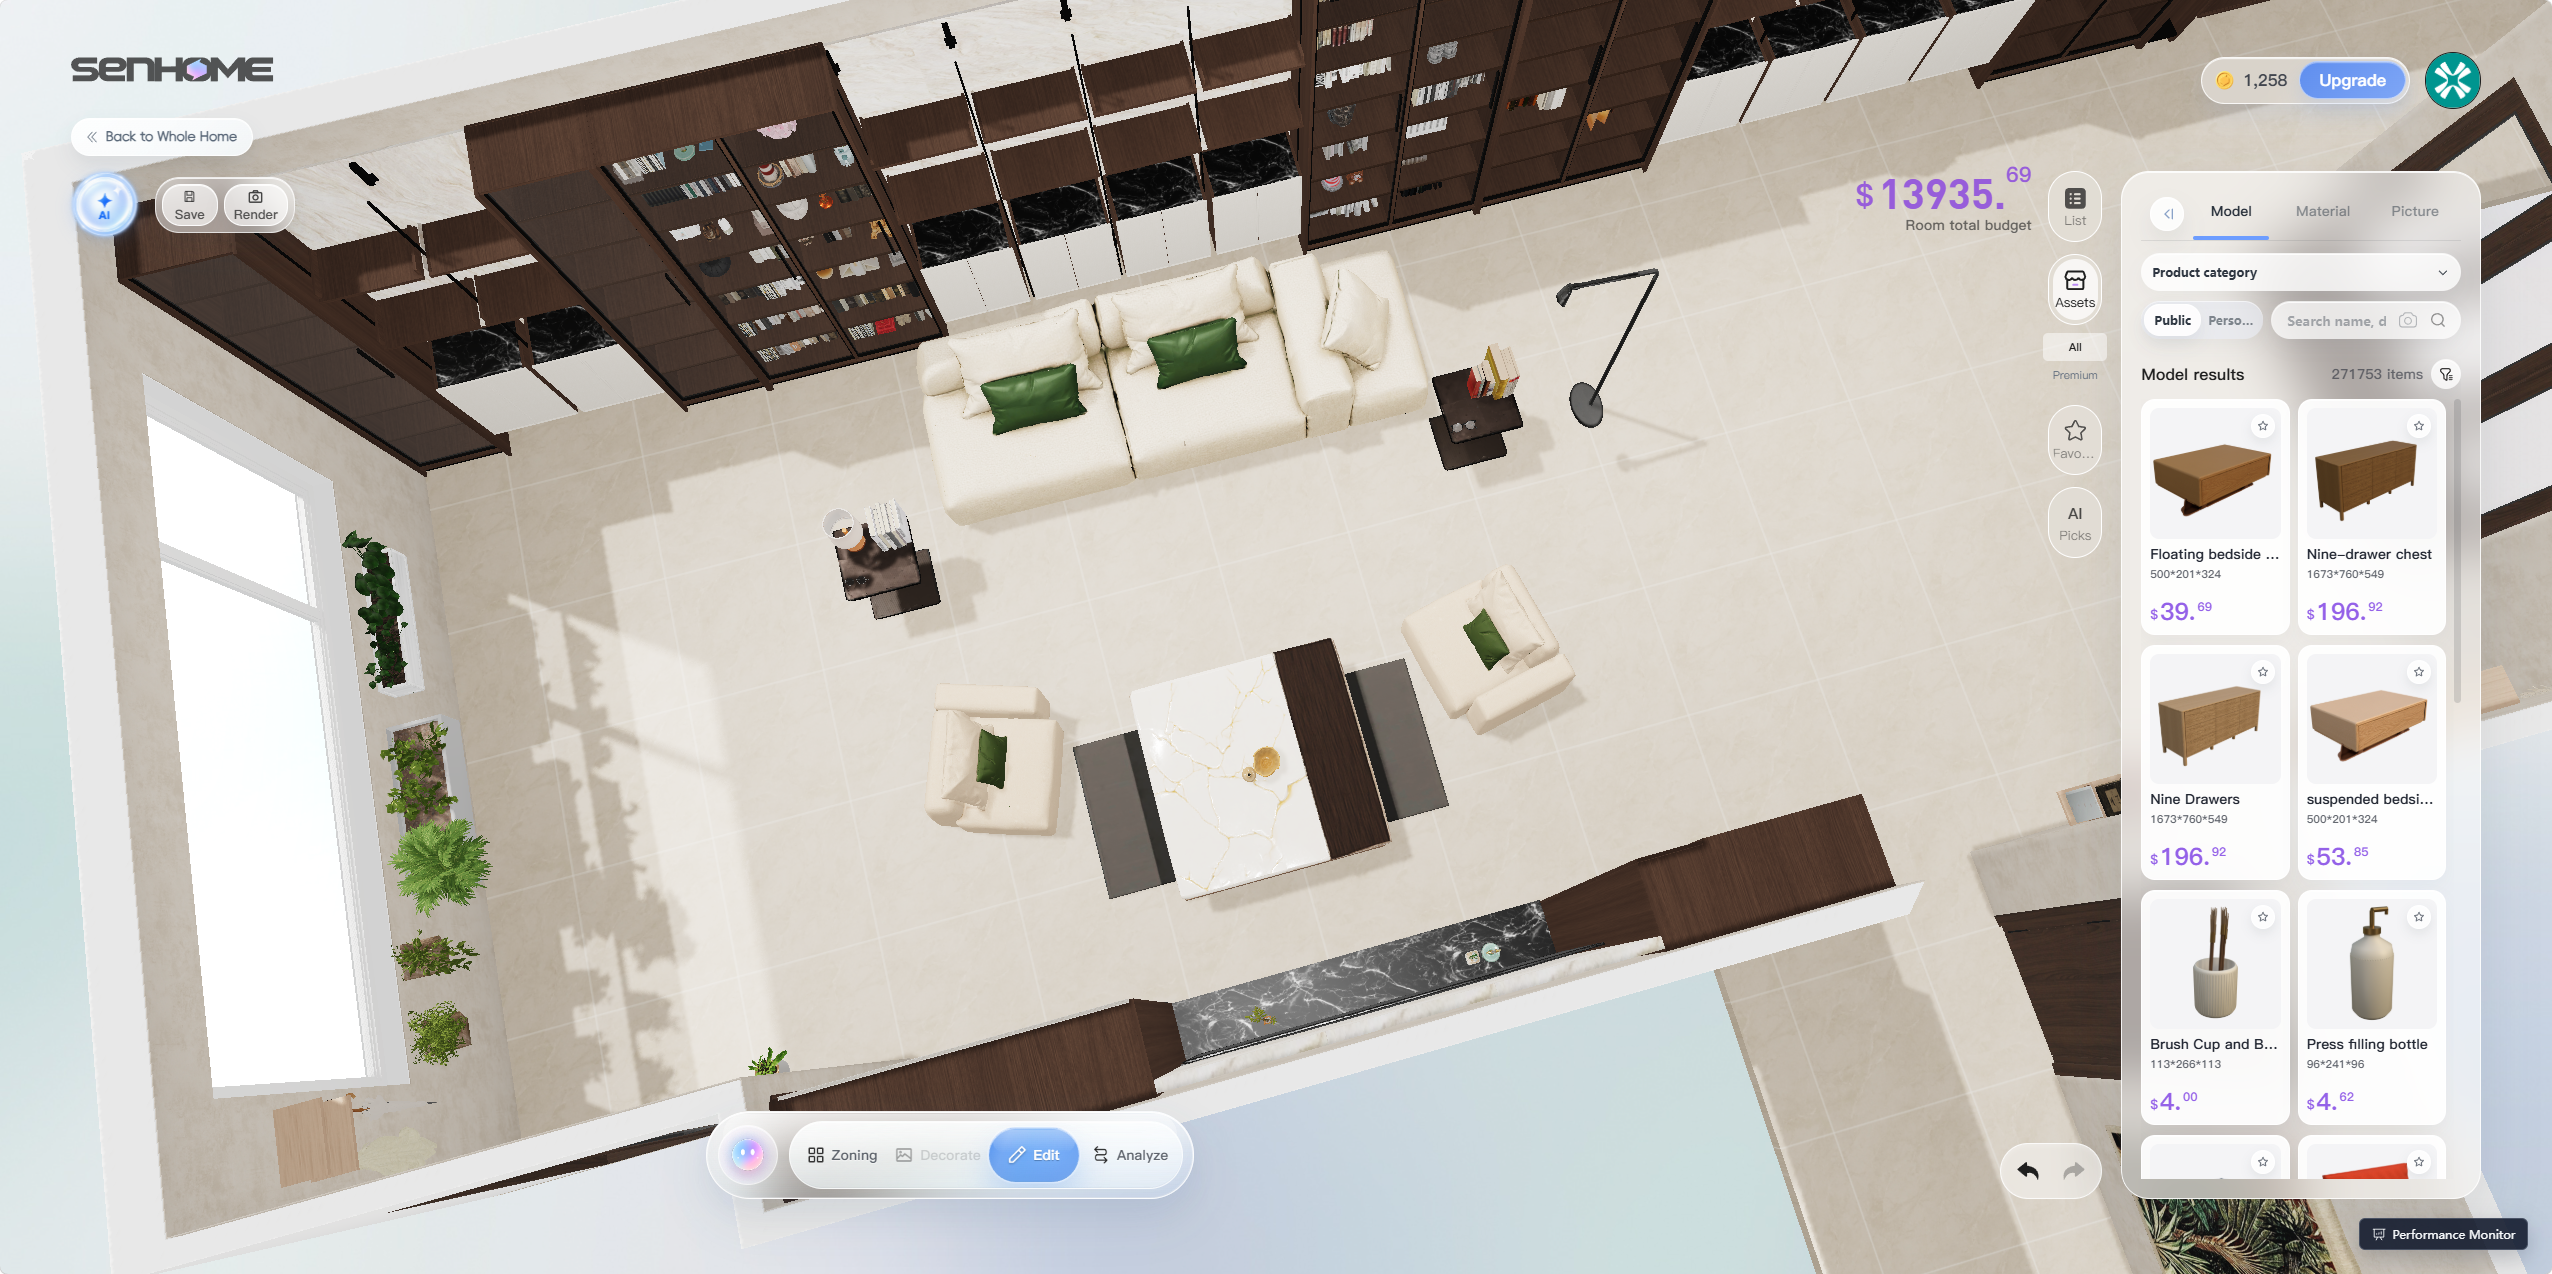
What matters in practice is how you can change the first draft. With an editable scene, you can keep the parts you like and work directly on the furniture or area that needs adjustment.
Render the Design Once the Layout Is Ready
Once the 3D proposal is ready, you can generate a rendered image to review the materials and lighting or share the design with others.
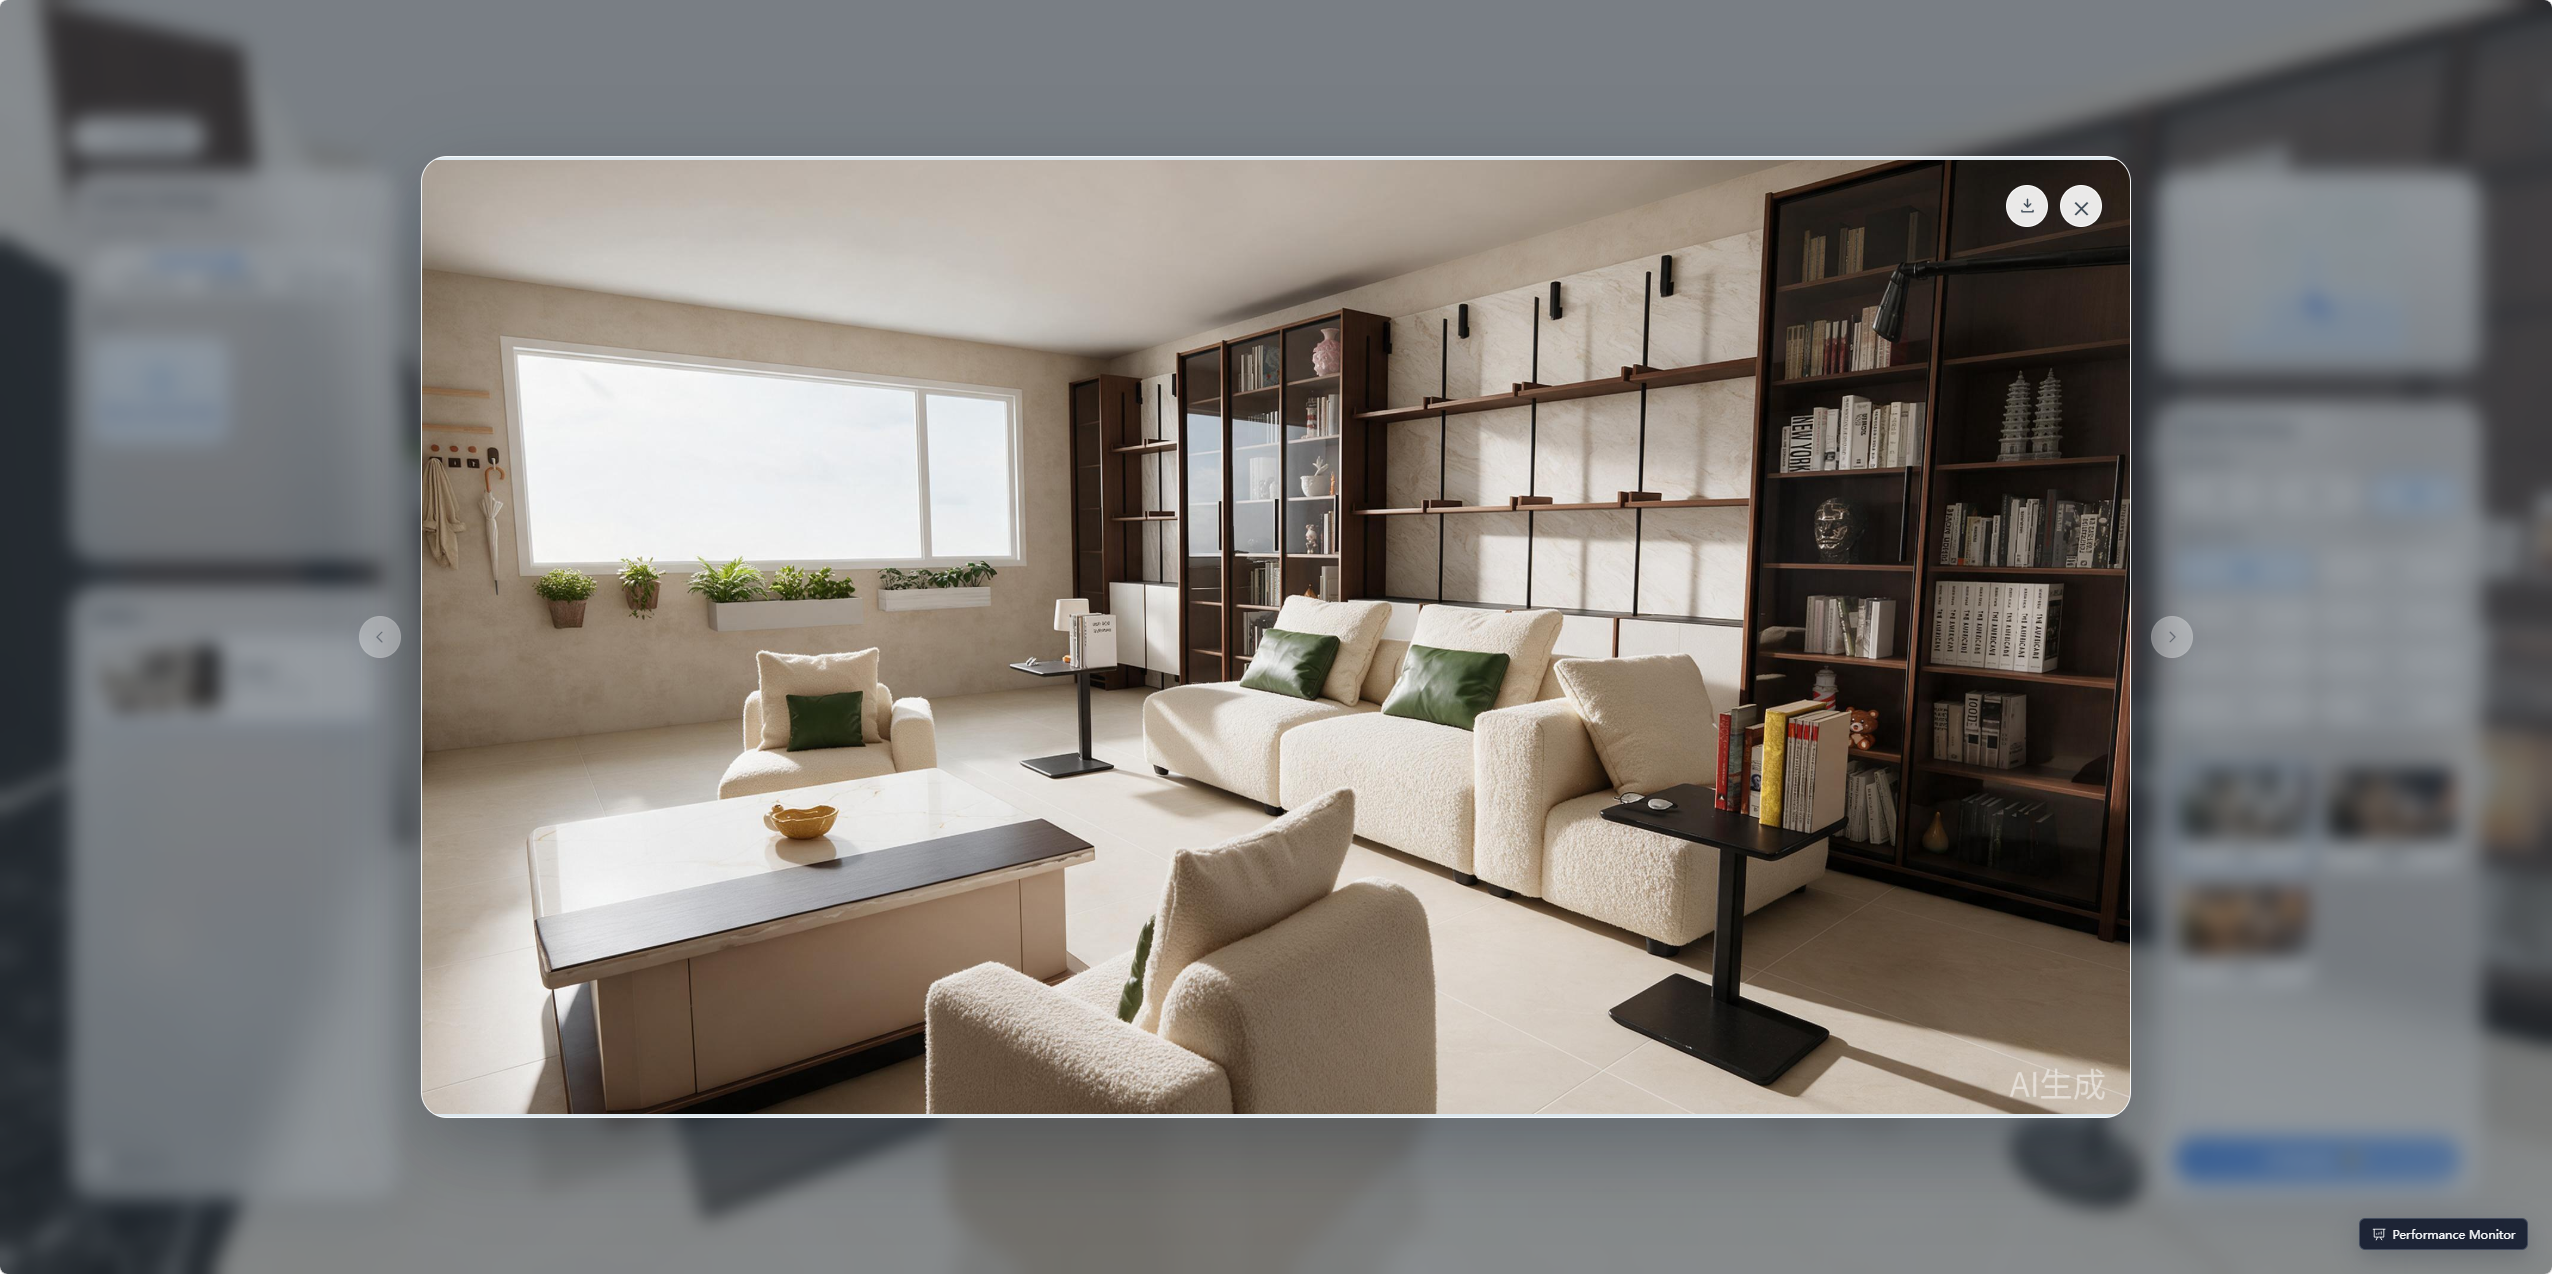
Both workflows produce images that help communicate a design. SenHOME also keeps the editable project, so you can return to the scene, change the sofa or layout, and generate new rendered images.
4. How SenHOME Takes the Workflow Further
SenHOME connects whole-home generation, individual room editing, and rendering. You can choose how to start, include selected furniture, and adjust the whole proposal or a specific area.
Choose an Inspiration or Provide Images and Text
SenHOME offers two ways to generate a design.
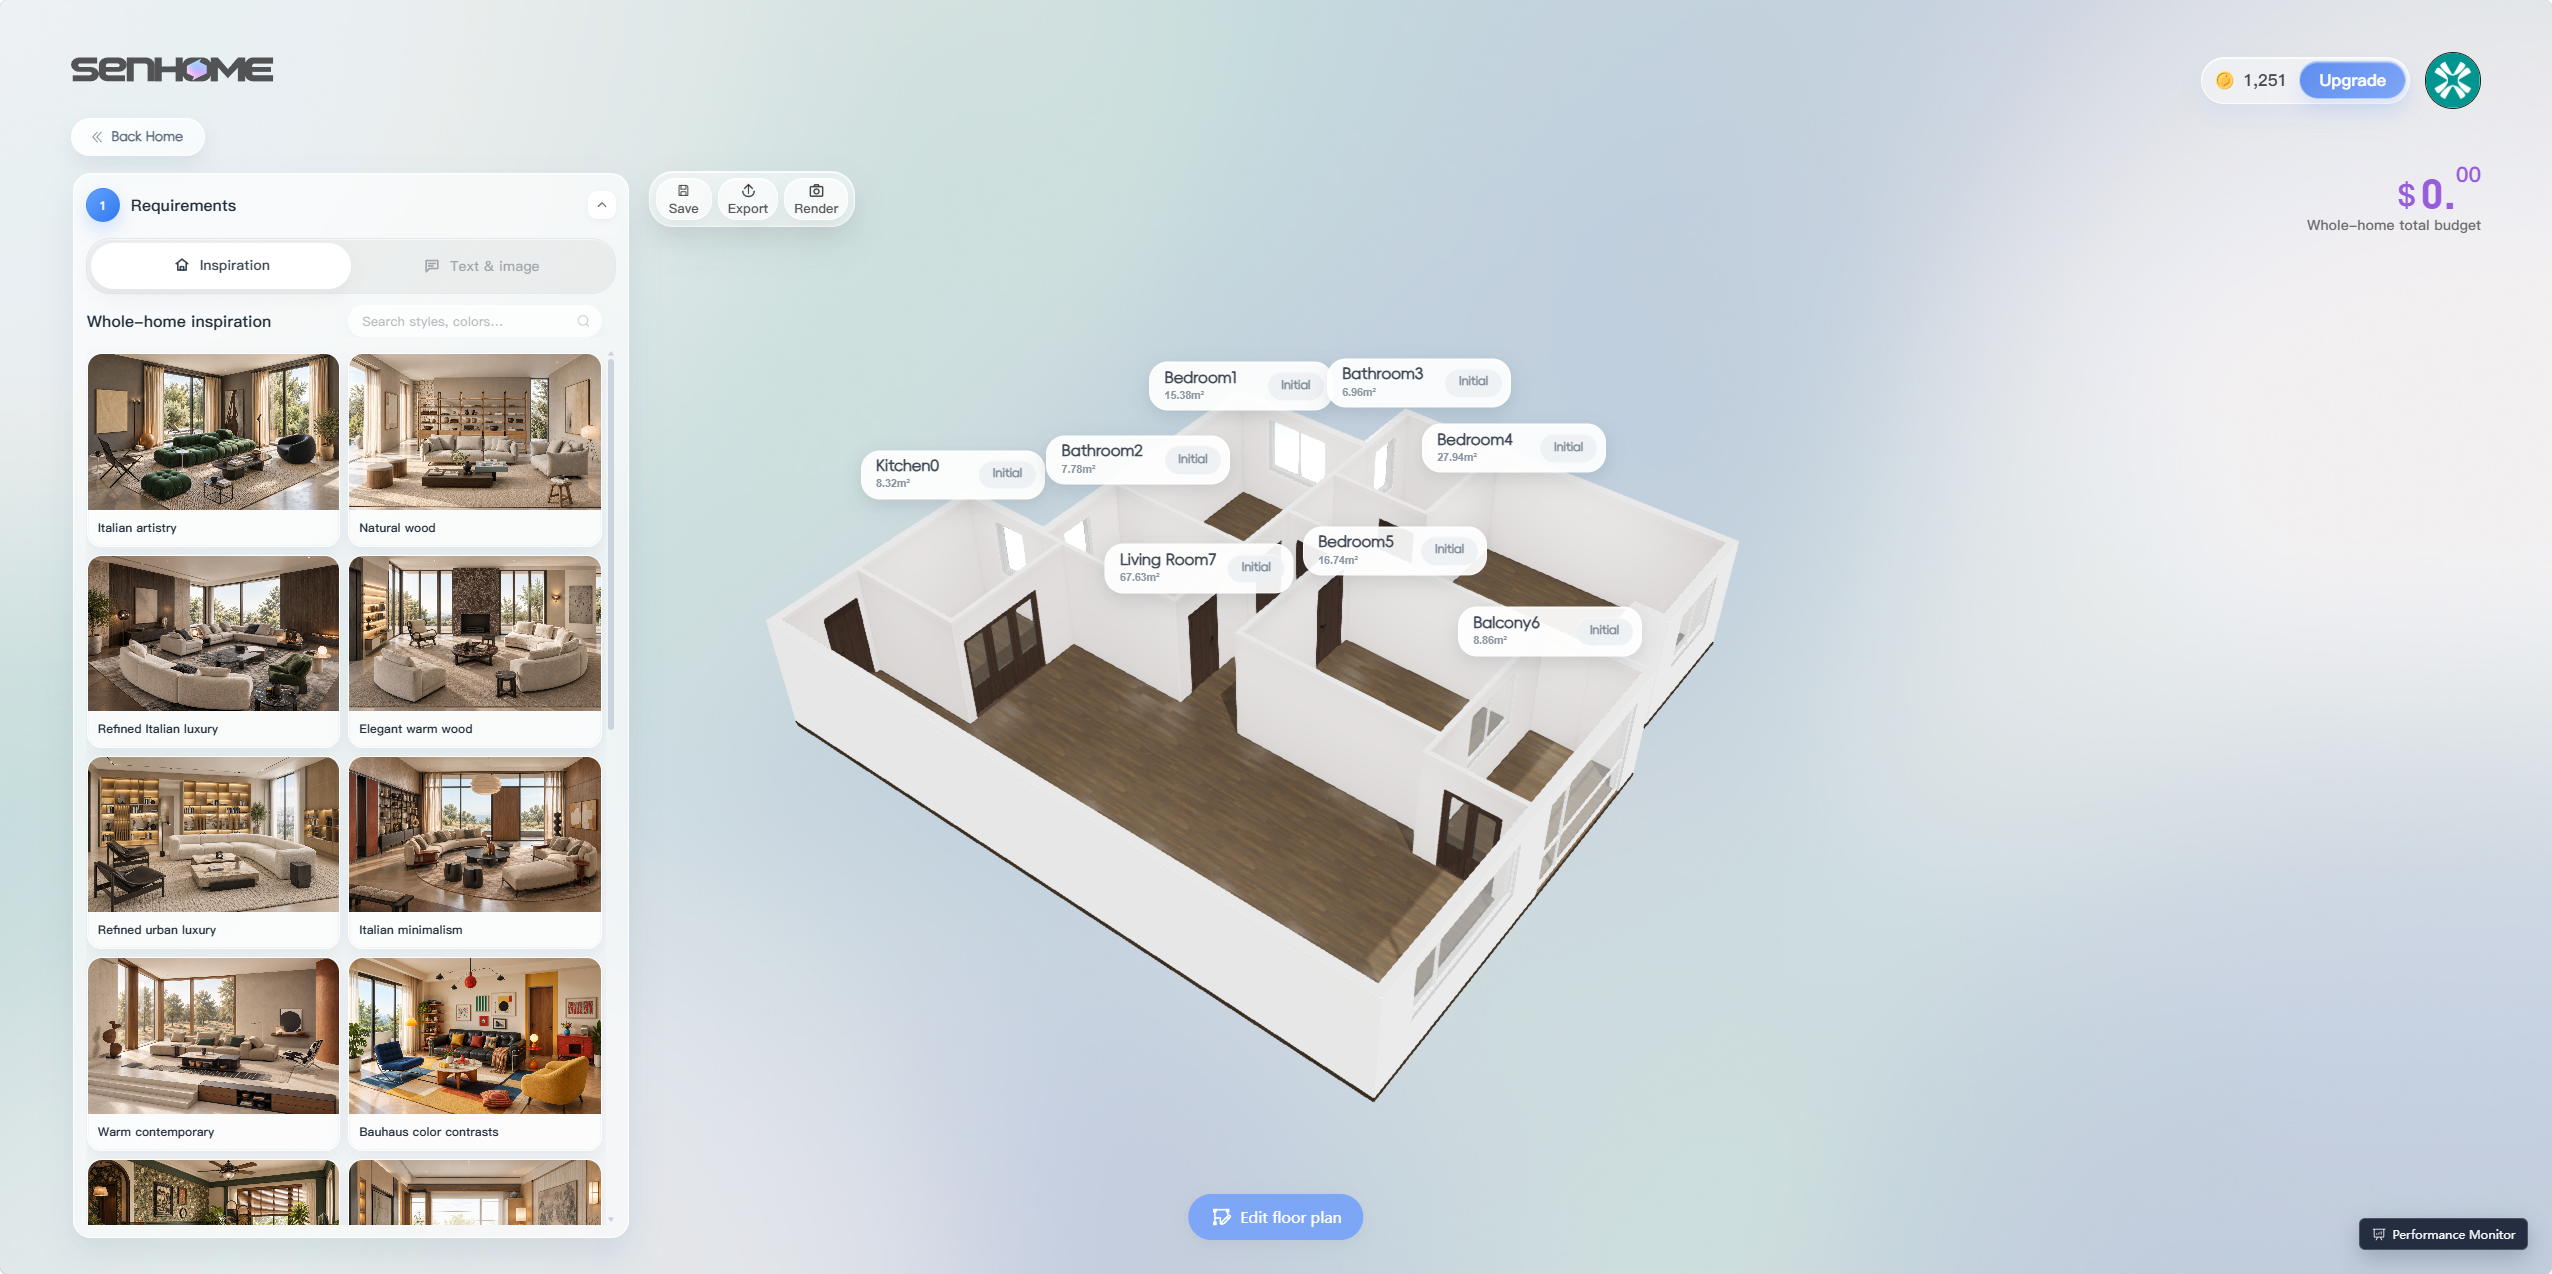
If you find an inspiration you like, you can select it as the starting point. This is a direct option when you have a clear visual preference but do not want to describe every detail.
You can also use images and text to explain your own requirements.
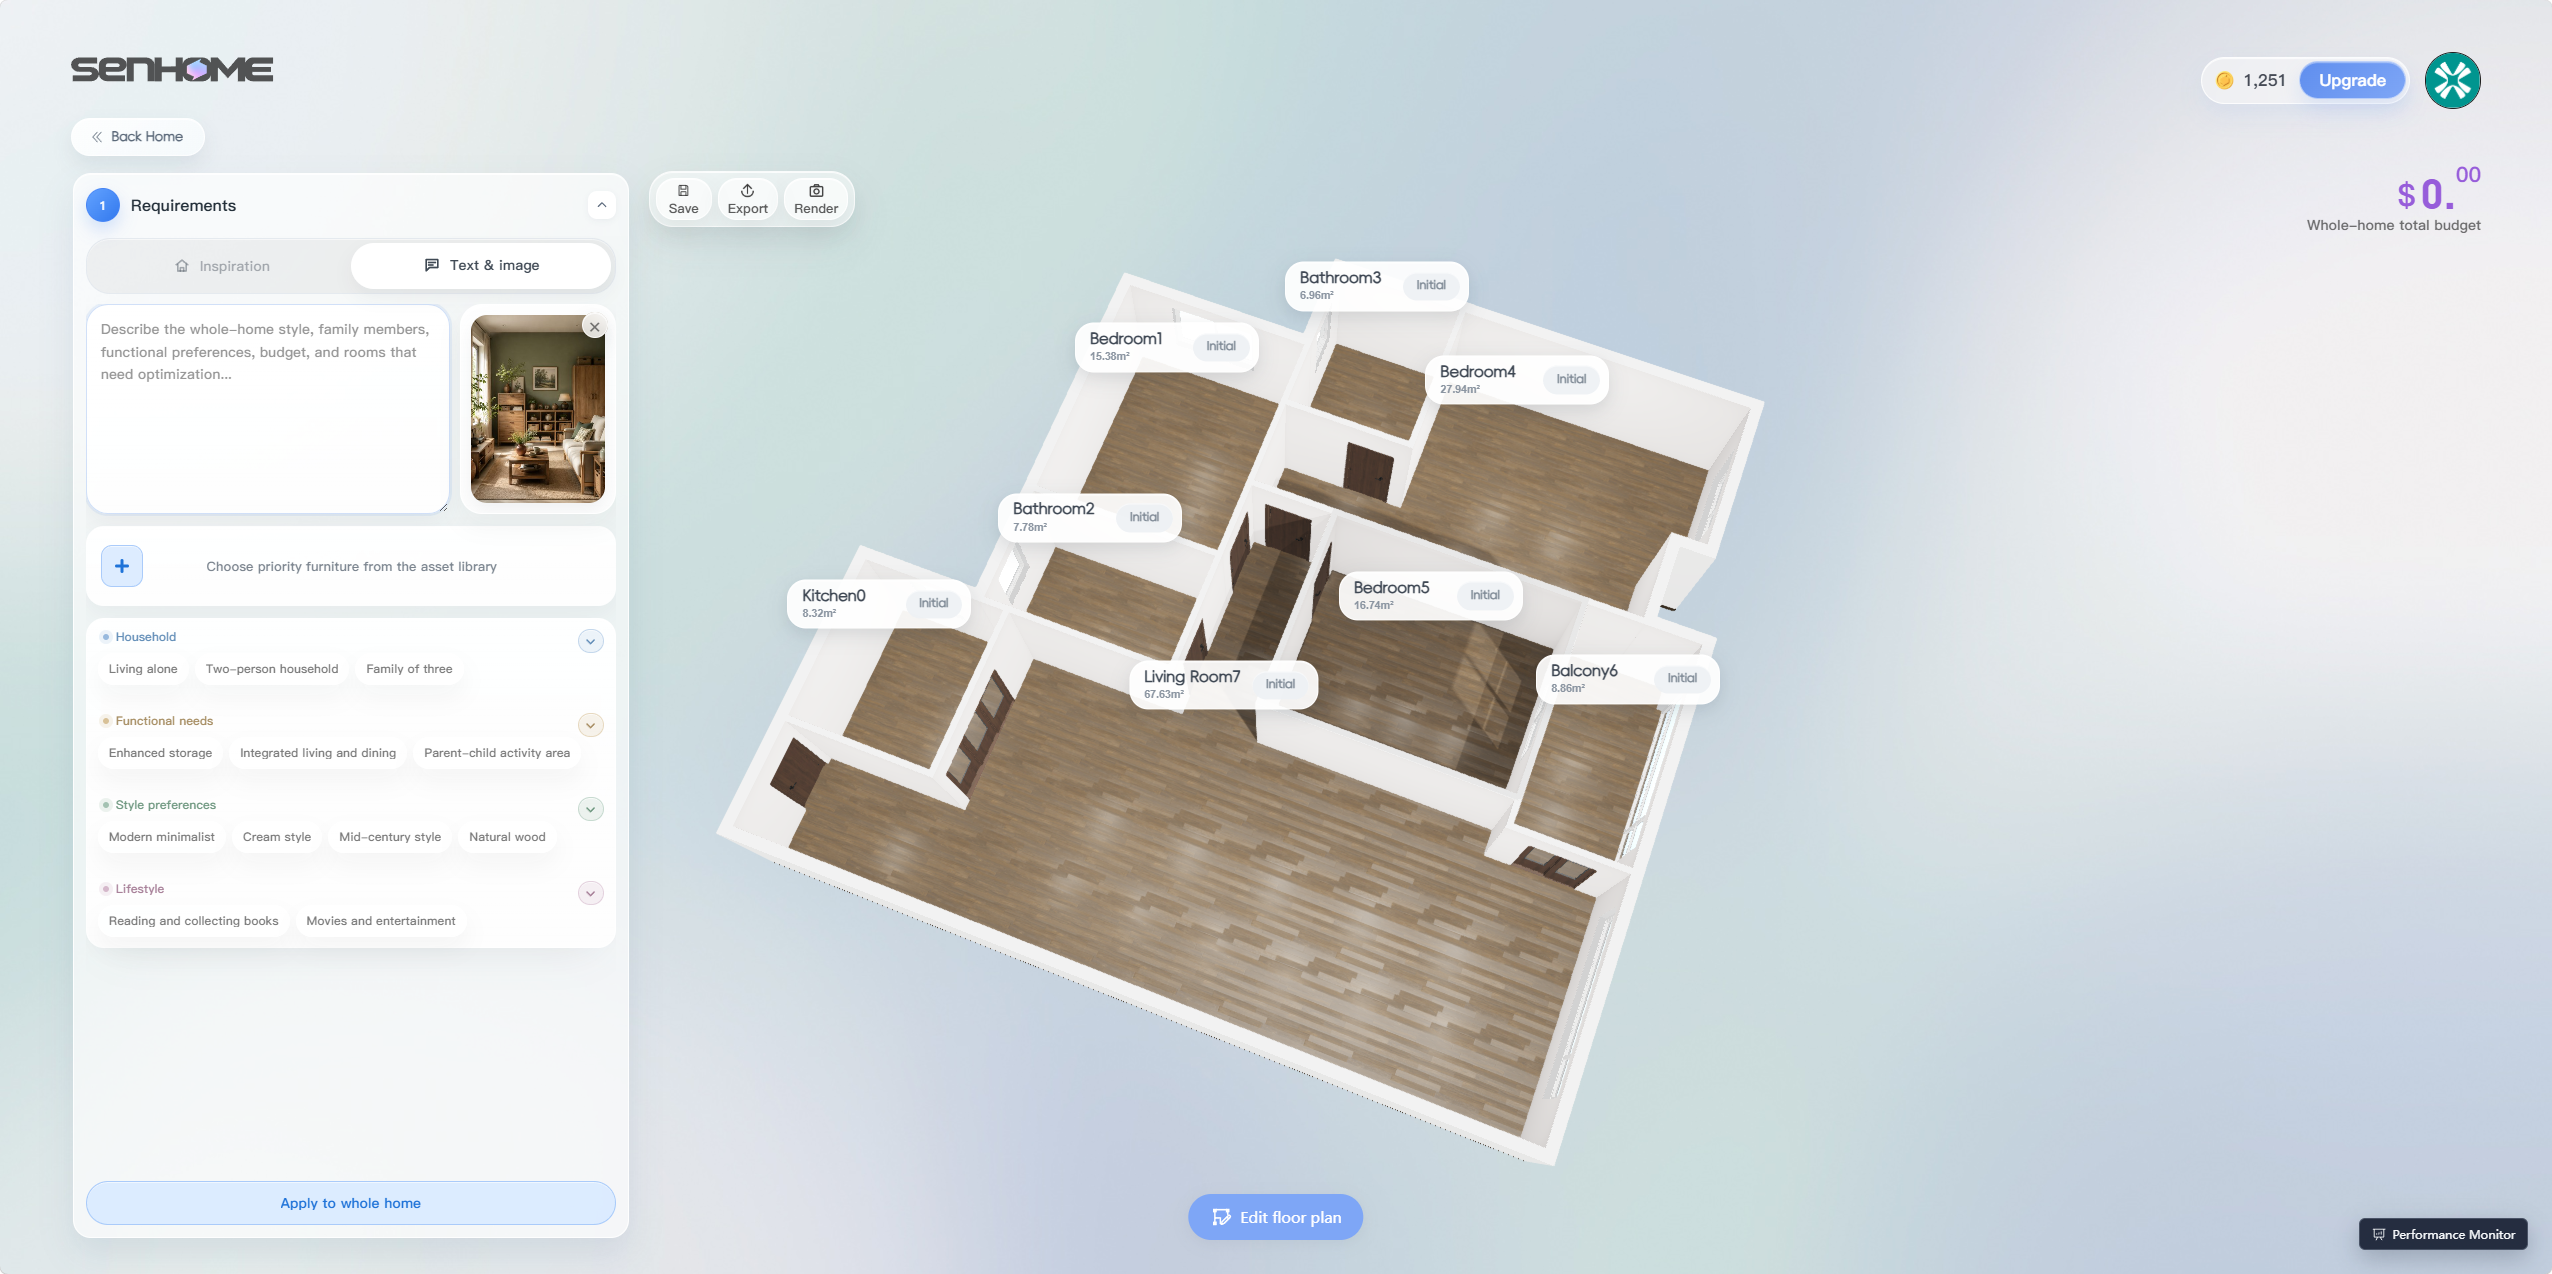
The two methods suit different starting points: choosing an existing direction or putting together your own design brief.
Include the Furniture Models You Want to Use
You can specify furniture models you want in the proposal. SenHOME prioritizes placing those models during generation.
This lets selected furniture take part in the layout planning from the start, instead of replacing pieces one by one after the proposal is generated. For example, you can provide a sofa model and develop the design around it alongside the dining area.
Make Adjustments at Different Levels
After generation, SenHOME supports different levels of editing.
You can use AI to adjust a zone, change a specific part of the decoration, or discuss modifications with the agent. If the dining area needs work, you can focus on that area without redesigning the entire room.
You can also edit the design yourself. When you know what you want to change, DIY controls let you directly adjust furniture positions, materials, and layout.
The two approaches can be combined: ask AI to revise an area, then make the final adjustments manually.
Generate Rendered Images from the Design
Once the layout and details are settled, you can generate rendered images to present the proposal.
The workflow covers both the editable design and its presentation: generate a proposal, adjust the space, then create images from the developed design.
5. Which Approach Should You Choose?
Choose image-based AI when you mainly want to explore styles, colors, materials, or atmosphere.
An editable 3D workflow is more suitable when you need to plan around selected furniture, compare layouts, inspect different viewpoints, or keep refining a proposal.
You can also combine the two. Use reference images to establish a visual direction, then develop it around your own floor plan in a 3D scene.